Tuesday, January 24, 2012

Poncho DIY for DIY Tuesdays

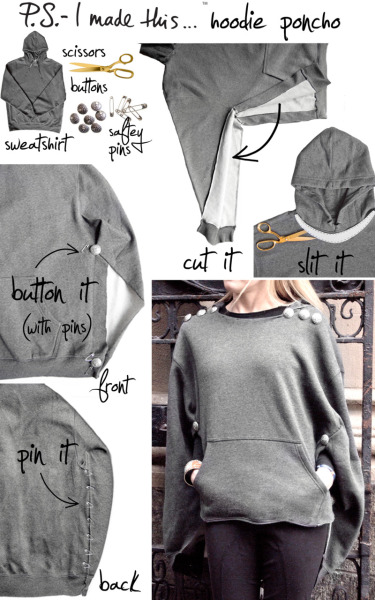
It's Poncho Time!! The weather has been very hormonal lately, at least in California, but this DIY could definitely offer some reprieve. It's a sweater poncho that will probably take you less than an hour to make. It's easy, it's fun, and of course you can customize it Beyond what you see and add your own special flare. For directions visit http://psimadethis.com/post/16120028755/comfort-plus-cuteness-makes-for-a-winning-combo . Enjoy!!
Comfort plus cuteness makes  for a winning combo, so punch up your look with a poncho!   Create a  fresh look by reinventing a classic piece and stay cozy with this  nouveau hoodie overhaul. To create, make a cut from the side seam of the sweatshirt body as well as each side  of the inner-arm.  Open up the neckline with a crew neck cut-out.  Be  sure to  cut ONLY the top layer so you don’t loose the hood.  Close up the back  by pinning large safety pins (or feel free to  sew) across your new open seam. Cut the bottom sides (both front and  back) into a curved shape, keeping the back a bit longer than the front.  Secure the sleeve to the torso, which creates  a poncho silhouette. Use large safety pins and pin approximately  halfway down the bodice.  For the armhole, attach buttons on the top and  bottom front sections.  Use any button you like and attach with safety  pins or sew. Use the same buttons to add accents to the shoulder  seam.


INSPIRATION!!!

No comments:

Post a Comment